Warehouse activities in Business Central includes Warehouse Put-away, Warehouse Pick, Warehouse Movement, Inventory Put-away, Inventory Pick and Inventory Movement. The functionality in the mobile devices are used to confirm the warehouse activities created in the system.
There are 4 ways to confirm the warehouse activities;
- Tablet Client – Paperless
- Tablet Client – Barcode
- Phone/Scanner Client – Paperless
- Phone/Scanner Client – Barcode
Tablet Client – Paperless
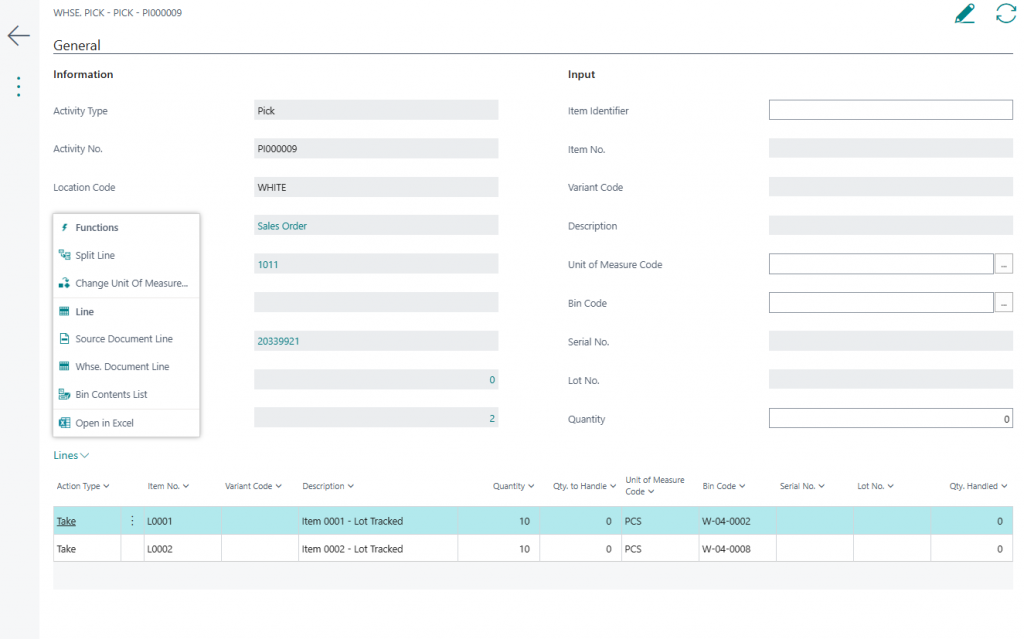
The role center have a stacks that shows the number of Put-aways, Picks and Movements. The stacks each count the records in the Warehouse Activity Header table. The Put-aways shows both Warehouse and Inventory Put-aways, the Picks will show both Warehouse and Inventory Picks, etc..
When a user selects one of the stacks a list pages is opened that’s based on the Warehouse Activity Header table. The list of Warehouse Activities are based on the setup field in the Mobile Warehouse User Setup table named Show Activities, the field will have the following options; ‘All, Assigned, Assigned + Unassigned’. If the All option is set the page shows all the records, if the Assigned option is set the page will just show records where the Assigned User ID equals the user id, if the Assigned + Unassigned option is set the page will show all records where the Assigned User ID equals the user id plus all warehouse activities where the Assigned User ID is blank. Records assigned to the user have the No. field styled as ‘Attention’, records assigned to another user have the No. field styled as ‘Unfavorable’. The list is also filtered by location code the same way as standard Business Central (using the warehouse employee table).
When a user select one of the Warehouse Activities the system will check the Assigned User ID, if it is blank it will be updated to the user id (this way the activity is automatically assigned to the user that selects it), if it is a different user already assigned a confirmation dialog will be displayed asking ‘Warehouse Activity is assigned to USER1 change the assignment to USER2?’ if No is selected the operation will be aborted if ‘Yes’ is selected the Assigned User ID will be changed. At the time of assignment, all the lines will be updated with the Qty. to Handle set to 0 and the page to input data will be displayed.
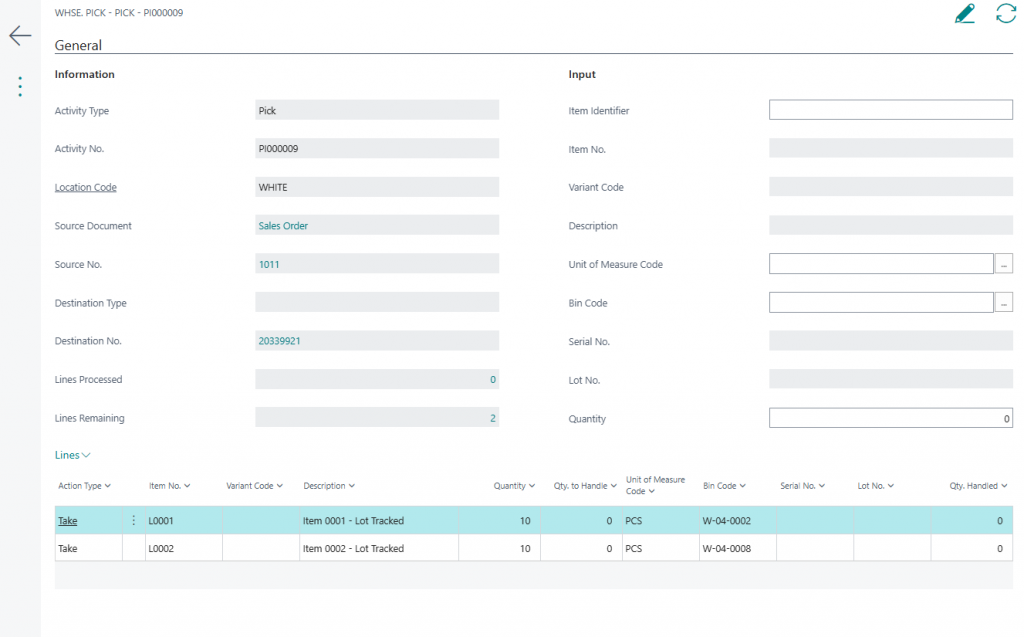
The user can either input the information in the header and have the lines be populated or make changed to the lines.
When input the information in the header;
The Item Identifier field is used to input the item being processed, it can accept an item number, an item cross reference number, lot number, serial number or an item identifier (from the standard NAV item identifier table). The Item Identifier field will be something that’s common across the entire Naviona Mobile solutions wherever an item is to be entered.
When the quantity field is entered in the header the system will check if all required information is entered (e.g. if the item is lot tracked it will check if a lot number is entered, etc..), if so the corresponding line will be updated. If there are multiple lines with the same item/variant/lot/serial combination it will search to see if one of them matches the bin code, if so that one will be updated, if not the first line that matches the item/variant combination will be updated. The quantity, lot no., serial no. and bin code is updated on the line. After updating the line a confirmation messaged will be displayed as ‘Line Updated!’ and the input fields in the header will be blanked out.
For the warehouse type of activities there are pairs of lines, one ‘Take’ and one ‘Place’, both lines are updated at once.
If the quantity is less than what’s required a dialog will be displayed asking ‘Split Line?’, if the user selects ‘Yes’ then line will be split into two (the same way as standard Business Central splits a line).
If there are no more lines to update a confirmation massage saying ‘Register Warehouse Activity?’ or ‘Post Warehouse Activity?’ will be displayed. If the user selected ‘Yes’ the warehouse activity will be processed. There is also an option to manually register/post the warehouse activity if not all lines are to be processed.
Tablet Client – Barcode
For the barcode driven process there are barcodes added to printouts.
When the barcode is scanned, the system will know what type of activity it is and what Warehouse Activity it belongs to. The process described in the previous section will then start; the Assigned User ID will be updated and the same page as in the previous section will be opened.
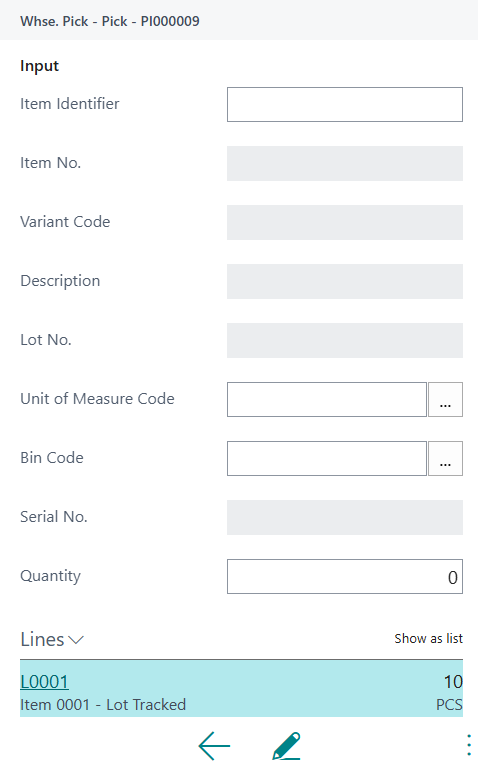
Phone Client – Paperless
The paperless process for the phone client start the same way as the paperless process of the table client; a stack on the role center is selected and the list of warehouse activities are displayed. The list will be filtered the same way for the Tablet. When a user selected one of the warehouse activities (which will assign the user to it) a page displaying the lines for that warehouse activity is opened. On the list page of the warehouse activity lines the user can then see what needs to be handled. When selecting one of the lines a page for data input will be opened.
Phone Client – Barcode
For the barcode driven process there are barcodes added to printouts.
When the barcode is scanned, the system will know what type of activity it is and what Warehouse Activity it belongs to. The process described in the previous section will then start; the Assigned User ID will be updated and the same page as in the previous section will be opened.
Functions
The functions on the Warehouse Activities in the Mobile Solution mimics those that are part of the standard Business Central solution, with the addition of the Print Inventory Label and Capture functions. Those functions are described in separate articles here; Label Printing and Capture Pictures.